
Fusion Splicer Maintenance – Cleaning
To keep excellent splice quality, regular cleaning and inspection are required. Especially cleaning should be performed before and after each use. We recommend your splicer to be checked through our maintenance service once a year.
Clean each part with a cotton swab. Please bear in mind that daily cleaning can maintain splicer performance. Clean components before and after use.
The article consists of the following section:
1. Cleaning V-grooves
2. Cleaning LEDs and mirror protection glass
3. Cleaning bare fiber pads
4. Cleaning microscopes (objective lenses)
5. Cleaning heat shrink oven
6. Cleaning fiber holders
Before we start the cleaning, please do turn off the fusion splicer. Please refer to the following figure about fusion splicer components:
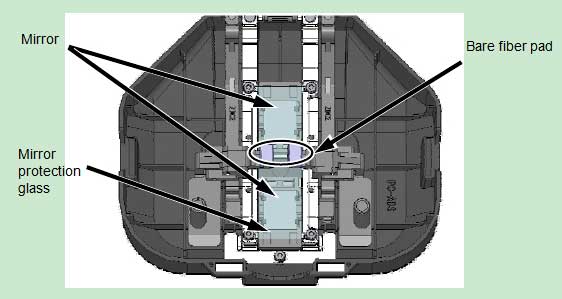 |  |
1. Cleaning V-grooves
Even tiny bits of dust or dirt in the V-grooves might cause the fiber to be offset. To avoid offset, carefully clean the V-grooves with a cotton swab moistened with alcohol.
| 1: Prepare a cotton swab moistened with alcohol. 2: Brush the surface of the V-grooves. | 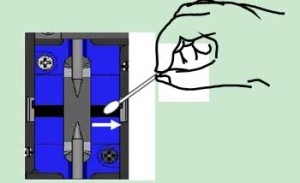 |
2. Cleaning LEDs and mirror protection glass
When a LED/mirror protection glass is dirty, a fiber image is unclear, resulting in imperfect image processing. If the display is uneven or LED error occurs, clean them with a cotton swab moistened with alcohol.
 1: Prepare a cotton swab moistened with alcohol.
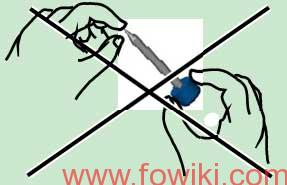
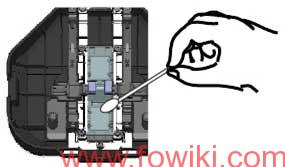 3: Gently wipe the mirror protection glass. Do not clean the mirror protection glass hard. Doing so will damage to the glass,
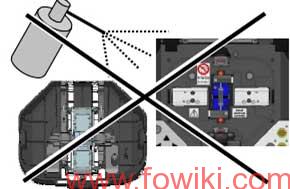 Prohibition: Do not use a canned air for cleaning. Chemical reaction may deteriorate the lens, resulting in a loss of splicing capability.
3. Cleaning bare fiber pads
Dirt on a bare fibre pad will also cause the fibrer to be offset. When fiber offset occurs, clean the bare fiber pad.
 1: Prepare a cotton swab moistened with alcohol. 1: Prepare a cotton swab moistened with alcohol. |  2: Clean the surface of the bare fiber pads. 2: Clean the surface of the bare fiber pads.3: Use a drycotton swab to wipe off any excess alcohol. |
 | Do not apply too much force when cleaning. |
4. Cleaning microscopes (objective lenses)
If an unclear fiber image is still displayed or LED error occurs again after cleaning LEDs or a mirror protection glass, clean the microscopes.
 1: Remove the electrodes, referring to the “Replacing electrodes” at page 35. 1: Remove the electrodes, referring to the “Replacing electrodes” at page 35. |  2: Prepare a cotton swab moistened with alcohol. Gently wipe the lens of the microscope in a circular motion. 2: Prepare a cotton swab moistened with alcohol. Gently wipe the lens of the microscope in a circular motion. |
 | 3: Use a dry cotton swab to wipe off any excess alcohol. 4: Re-fit the electrodes. 5: Perform an arc test. |
 Caution: An electrode tip is extremely sharp. Handle with care. Caution: An electrode tip is extremely sharp. Handle with care. | 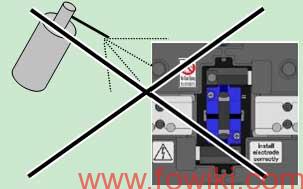 Prohibition: Do not use a canned air for cleaning. Chemical reaction may deteriorate the lens, resulting in a loss of splicing capability. Prohibition: Do not use a canned air for cleaning. Chemical reaction may deteriorate the lens, resulting in a loss of splicing capability. |
5. Cleaning heat shrink oven
Dirt and dust can accumulate in the heat shrink oven easily. Clean the heating plate regularly with a dry cotton swab.
 Clean the heating plate with a dry cotton swab. Clean the heating plate with a dry cotton swab. |  Clean the clamps of the heat shrink oven with a cotton swab moistened with alcohol. Clean the clamps of the heat shrink oven with a cotton swab moistened with alcohol. |
| Caution: Remove moisture or alcohol on the heat shrink oven with a dry cotton swab. |
6. Cleaning fiber holders
 Clean the fiber holders with a cotton swab moistened with alcohol. |