
How to splice fiber optic cable
This section is a detailed introduction about how to splice two fibers together to become a single core fiber. the instruction divided into several section, please refer the list as follow:
1. Preparing the splicer
2. Preparing the fiber
3. How to make a splice
4. How to check the splice strength
5. How to protect the splice
1. Connecting the power supply
•Connect the splicer to the main by inserting the power cable into the socket on the left side of power supply of the splicer.
Note: If the splicer is powered with a fully charged battery, then the main power supply is not necessary.
•Press the On / Off button on the side of the splicer unit on the top left of the front panel. If the LED becomes green, then the power is on. Press and hold the On / Off button until the LED flashes, then release the button and the splicer will power off.
Cleaning V-grooves
•Clean V-grooves, if necessary (see chapter 4 “Maintenance”)
Replace electrodes

•Check and make sure there are no fiber within the splicer and close the safety shield.
•From the main menu press: [setting button]
•In the replace electrodes, press: [menu button] “Confirm” to replace the electrodes.
Preparing the fiber
There are three basic preparatory steps to be completed before the fibers can be placed in the splicer:
•Stripping
•Cleaning
•Cleaving
Note: Always remember to slip a heat-shrinkable sleeve onto either end of the fibers at the beginning of each fiber preparations.
Important: Preparing the fibers for splicing is one of the most important factors in the splicing process and must be carried out with the utmost care to minimize splice loss. Poorly cleaned and cleaved fibers will normally result in high splice loss and low mechanical strength.
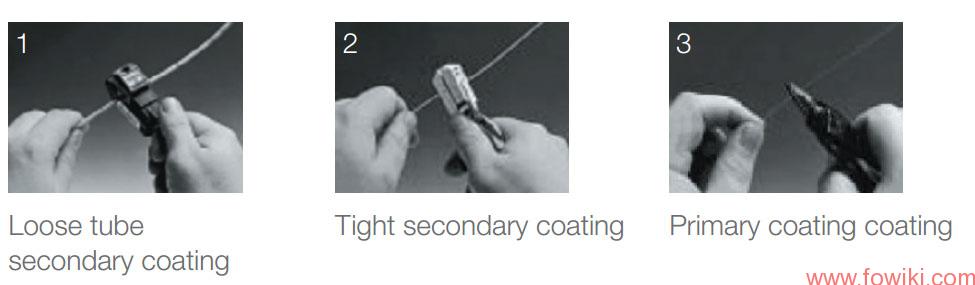
How to strip the fiber
•Remove at least 50mm of secondary coating (valid for both tight and loose tube secondary coating) with an appropriate stripper (see A, and B).
•Remove approximately 30mm of primary coating with an appropriate stripper (see C).
Important: Do not put extra stress on the fibers by bending or crimping them. (see illustrations of different strippers below.)
How to clean the fiber
Clean bare fibers with a tissue or a pair of cotton swabs soaked in propanol or ethanol.
Important: From this point, you must be very careful with the fibers to ensure that they do not become dirty again. (for example, avoid putting them down on a dusty working surface, or even waving them around in the air). Also check if the V-grooves are clean, if not, wipe them clean.
How to cleave the fiber
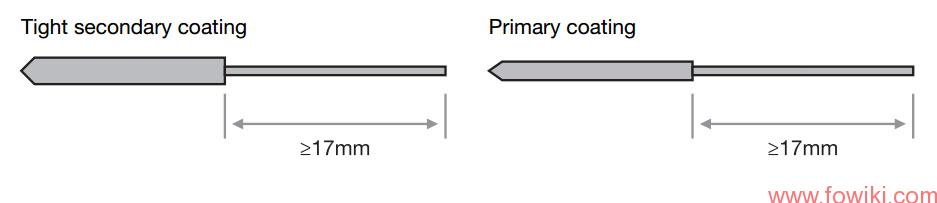
Cleave the fibers using a high quality cleaving tool (e.g. INNO InstrumentVF-78). Follow the instructions from the manufacturer’s menu of the cleaver. To ensure good splicing, you must also observe the cleaving lengths shown below.
Examples of cleaving lengths
Fiber preparation checklist
As previously stated preparing the fibers for splicing is one of the most important factors in the splicing process and must be carried out with the utmost care to minimize splice loss. Therefore, consult the check-list backwards to ensure that these steps should be carried out.
Fiber preparation checklist
•The correct V-grooves are selected (see chapter 4 “Maintenance”)
•The fiber clamps and V-grooves are clean
•A heat-shrink sleeve is in place
•The fibers are stripped
•The fibers are clean
•The end-faces are well-cleaved
•The cleaving lengths are correct
How to make a splice
Inserting the fibers
•Open the safety shield.
•Raise the fiber clamps.
•Position the fibers into V-grooves.
Note: Be careful not to slide the fibers along V-grooves, but rather position them over V-grooves and tilt them down into place (see below).
•Make sure the fiber ends are visible on the monitor. (a) If the fiber ends are not visible, the splicer will try to find them by moving the fibers horizontally. The ends will be found if the fibers are placed within the mechanical movement range of the horizontal motors (b). If not, an error message will be displayed. The splicer
will not find fiber ends that are placed above or below the imaging area (c). Normally, this should only happen if the V-grooves or the fibers are dirty, or if the splicer is not well adjusted.
•Clamp the fiber in position by lowering both sets of fiber clamps.
•Close the safety shield.
Inspecting the fibers
•Before continuing with splicing, you should visually check the fibers in the monitor to make sure they are clean and well cleaved. To change between front view and back view, press:
Note: The fibers are checked automatically when you press ”Splice” button. The splicer automatically focuses the fibers and checks for damage or dust particles.
Splicing
•Select any desired splice program (described in detail in chapter 4 “Splice programs” – “Selecting a splice program”).
•Splice the fibers by pressing:
Note 2: The splicer always starts as ”Auto mode”. The name of the active program appears at the bottom of the display.
How to protect the splice
After splicing, protect the joint by using a heat-shrink sleeve and the heat oven, which is mounted onto the splicer. “Shrink” process can be activated by heat button or auto heating mode.
Prepare to move the fiber from the splicer to the oven
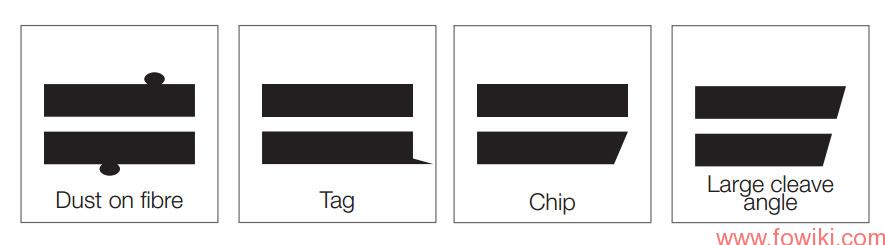
Dust on fibre Chip Ta g
Large cleave
angle
Make sure if any defects are found, as illustrated below, remove the fibers and prepare again.
1) Opening the heat oven lid Moving the fiber to the heat oven
•With the spliced fiber still positioned in the splicer, open the heat oven lid by sliding it backwards.
•Raise left and right fiber clamps on the splicer. Holding the heat-shrink tube (previously placed onto the fiber), lift the spliced fibers and holding them taut, move the heat-shrink tube so that it is centered over the splice point.
•Move both the fibers and the heat-shrink tube over to the heat oven and place them in the oven clamps.
Important: Do not bend either the splice point or the fibers while bringing to the oven. If necessary, center the heat-shrink sleeve again.
•Close the heat oven lid.
2) Lifting and holding the fibers 3) Moving the fibers and heat-shrink tube to the heat oven
Shrinking
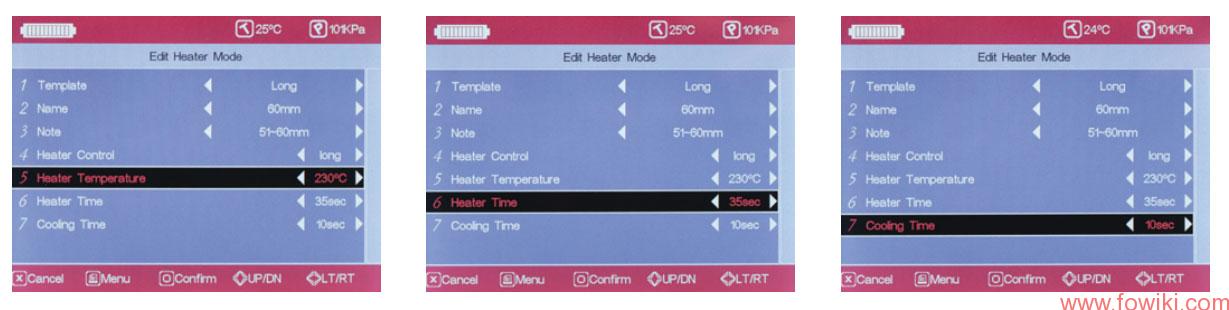
•From main menu (see A) or after splice menu (see B), press:
•The oven heats up to “Heater temperature” parameter described under “System settings” utility. (see A)
•Heating continues for the set “Heater time” parameter. (see B)
•The oven cools down during the time specified by “Cooling time” parameter. (see C)
•When the shrink process is complete, open the heat oven lid and remove the fiber.
Note 1: If no cooling is required, “Cooling time” should be set to zero.
Note 2: You can stop both heating and cooling by opening the heat oven lid.
Note 3: The parameters of “Heating temperature”, “Heating time” and “Cooling time” can be adjusted as described under “System settings” utility.
Resetting fiber movement motors
•Remove the fiber from the splice position.
•To return to main menu and reset the motors (before, during or after heat-shrink process), press: [RESET BUTTON] The fiber movement motors return to their home positions ready for the next splice.