
Maintenance of Splicing Quality
1. Cleaning and Checking before Splicing
Critical cleaning points and maintenance checks are described below .
1-1. Arc Power Calibration
Refer to [Arc Calibration] (Page 42).
1-2. Cleaning V -grooves
If contaminants are present in the V -grooves, proper clamping may not occur, resulting in higher splice loss. The V -grooves should be frequently inspected and periodically cleaned during normal operation. T o clean the V -grooves, do the following:
(1) Open the wind protector.
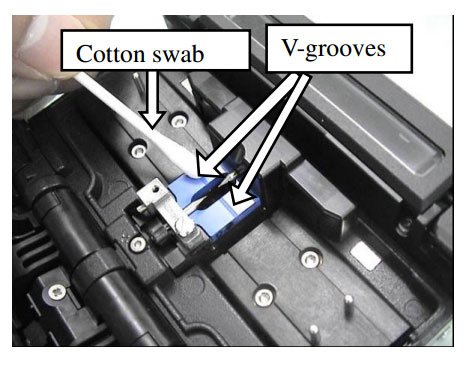
(2) Clean the bottom of the V -groove with an alcohol-impregnated thin cotton swab. Remove excess alcohol from the V -groove with a clean dry swab.
Be careful to avoid contact with the electrode tips.
(3) If the contaminants in the V -groove cannot be removed with an alcohol-impregnated thin cotton swab, use a cleaved fiber end-face to dislodge contaminants from the bottom of the V -groove. Repeat step (2) after this procedure.
1-3. Cleaning Fiber Clamp Chips
If contaminants are present on the clamp chips, proper clamping may not occur, resulting in poor quality splices. The fiber clamp chips should be frequently inspected and periodically cleaned during normal operation. To clean the clamp chips, do the following:
(1) Open the wind protector .
(2) Clean the surface of the clamp chip with an alcohol-impregnated thin cotton swab. Remove excess alcohol from the clamp chip with a clean dry swab.
1-4. Cleaning Fiber Cleaver
If the circular blade or elastomer clamp pads of the fiber cleaver become contaminated, the cleaving quality could degrade. This may lead to fiber surface or end-face contamination, resulting in higher splice loss. Clean the circular blade or elastomer clamp pads with cotton swab soaked with alcohol
2. Periodic Checking and Cleaning
In order to maintain the splicing quality , periodical inspection and cleaning are recommended.
2-1. Cleaning Objective Lenses
If the surface of the objective lens becomes dirty , incorrect observation of the fiber position may occur, resulting in higher splice loss or poor splicer operation. Therefore, clean both objective lenses at regular intervals. Otherwise, dirt may accumulate and become impossible to remove. T o clean the objective lenses, do the following:
(1) Before cleaning the objective lenses, always turn off the splicer.
(2) Gently clean the lenses (X-axis and Y -axis) with an alcohol-impregnated thin cotton swab. Using the cotton swab, start at the center of the lens and move the swab in a circular motion until you spiral out to the edge of the lens. Remove excess alcohol from the lens surface with a clean dry swab.
• Remove electrodes before cleaning objective lens.
• Do not hit or touch the tip of the electrode when cleaning.
(3) The lens surface should be clean and free of streaks or smudges.
(4) Turn on the power and make sure no smudges or streaks are visible on the monitor screen. Press to change the screen and check the state of the lens surface on both the X- and Y -screens. Perform the dust check procedure.
2-2. Electrode Replacement
Refer to Page 56 [Replace Electrode].
2-3. Diagnostic T est
Refer to Page 59 [Diagnostic T est Function].
2-4. Rotating the Cleaver Blade
If the cleaver does not cleave properly , rotate the blade 1/16th of a turn to replace the worn out blade position with a sharp blade position. Blade life is normally 1000 cleaves or 250 ribbon cleaves per blade position. T o rotate the blade, do the following:
(1) Remove the blade cover .
(2) Using a 1.5mm hex wrench, remove the fiber scrap container box or the side cover.
(3) Push the slide button until it locks.
(4) Using a 1.5mm hex wrench, loosen the blade lock screw.
(5) Rotate the circular blade 1/16th of a turn.
(6) Tighten the blade lock screw.
(7) Attach the blade cover.
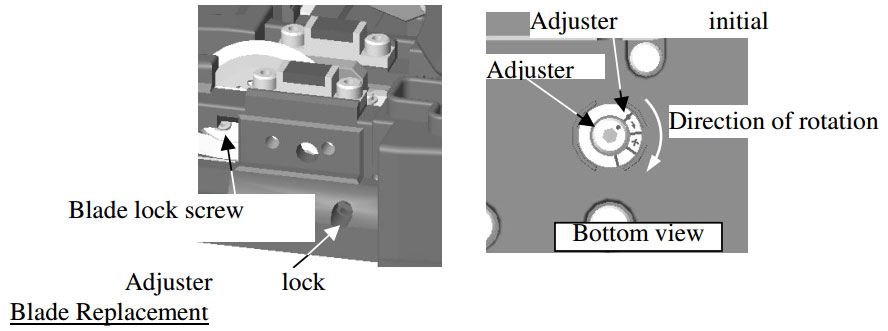
Blade Height Adjustment
After the circular blade has been rotated a complete revolution (16 positions), its height needs to be adjusted to compensate for the wear .
(1) Using a 1.5mm hex wrench, remove the fiber scrap collector or the side cover .
(2) Using a 1.5mm hex wrench, loosen the blade lock screw .
(3) Using a 1.5mm hex wrench, loosen the adjuster lock screw .
(4) Using a 1.5mm hex wrench, turn the adjuster clockwise so that the reference dot
aligns with the next position mark. Never attempt to rotate the adjuster more than 2 position marks.
(5) Tighten the adjuster lock screw .
(6) Tighten the blade lock screw .
• When rotating the blade, do not touch the cutting edge. Move the blade with a thin cotton swab, for easy and safe rotation.
• After blade height adjustment, the 16 blade positions can be used again. If the cleaver does not cleave properly, rotate the blade.
Blade Replacement
After the circular blade has been raised 3 times and rotated through all positions (a total of approximately 48,000 fiber splices), it needs to be replaced. Contact your Fujikura splicer distributor .